How to make your own Self Watering Planters from storage totes. Save a bundle on buying expensive premade ones and grow your own healthy food.
My yard is mostly clay. Attempting to grow anything other than native plants can be quite difficult without a lot of soil amendments and water. So, for the last few years I have been experimenting with container gardening for my edibles. This year was another dismal year. The plants started with such promise, but ended up producing very little.
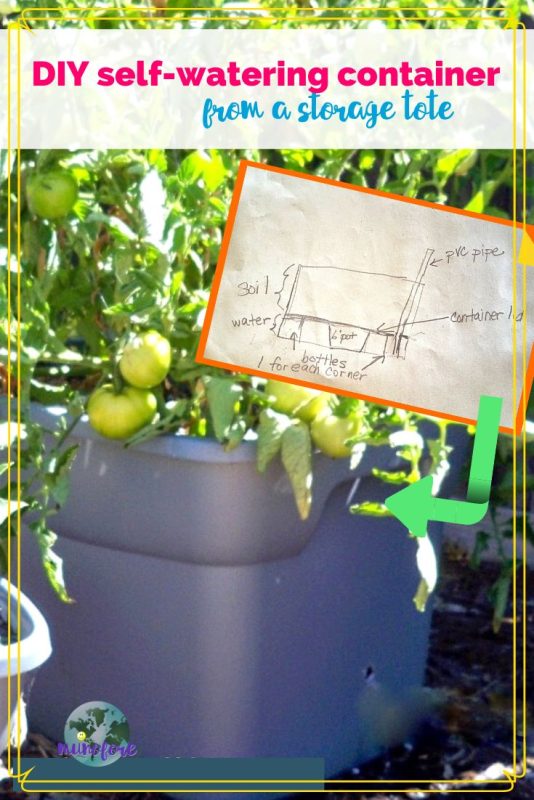
A few years ago I made these self watering containers out of 18 gallon storage tubs and they did fabulously as you can see.
When they fell apart I replaced them with these plastic file boxes lined with landscape fabric.
These might work very well in areas that get summer rain, but here in drought riddled California they require daily watering, if not more. And I admit there were days that it was just too hot to stand out there and water them.
How to Make a Self Watering Container
So, I decided it is time to go back to the self watering planters. This time I made a few changes, to make them even cheaper with the parts I had in the house. The original uses two containers for each planter. Mine uses only one.
What you need to make the each container:
- 1 18-gallon storage tub, plus lid (preferably with straight sides)
- 1 empty 6" plastic pot
- 4 thick plastic bottles (some 2 liter bottles may be too thin, juice or sport drink bottles are better)
- 2 foot long PVC pipe, at least ¾" interior diameter
- large piece of cardboard
- marker
- heavy duty scissors, box cutter, or knife
- drill
- hand saw (optional)
Put the plastic pot inside the tub. Use the cardboard to make a template for the interior shelf. It should sit on the plastic pot and go all the way to the inside edges. If your container doesn't have straight sides this will be a bit tedious as you carefully trim away the contours so it fits snugly.
Trace the outline of the template onto the container lid to make the interior shelf. Cut with the scissors, box cutter or knife.
Trace the bottom of the pot in the middle of the interior shelf. Cut out.


Cut the 4 bottles to the height of the plastic pot.

Drill drainage holes in the interior shelf.

Drill a few drainage holes in the 4 bottles.

Put the pot in the center of the container and 3 bottles in 3 corners. The last bottle will need to be about 1" from the last corner for the PVC pipe.

Cut the PVC pipe to 2 feet using the hand saw if necessary. If you have pre-cut pipe you can skip this.
Place the interior shelf on top of the bottles and pot. Place the PVC pipe in the corner, trace around it and cut it out.

Put the PVC pipe in the corner so it slides about ½ inch from the bottom and is not in the bottle.
 |
| photo bomb by Donnie |
Drill a drainage hole on one side of the container just below the interior shelf. This will prevent accidentally over-watering, especially in the rainy season.

Fill the upper portion of the container with soil.

Wet the soil and pack lightly, add extra soil if needed.
Plant seeds or seedlings and enjoy your new planters. Fill the bottom of the container with water by pouring water through the pipe.

I bought the containers for $7 each and had the rest of the parts in the garage, but even if you need to buy the PVC pipe, you are still looking at less than $10. Which is a tad cheaper than the $40 - $50 for ones you can buy.











Ashley Tukiainen says
Great ideas! I've always wondered about these. I love gardening but am horrible at remembering to water.....Add some Texas heat on that and it makes for a wasted container garden every year. Love all your photos on the how to 🙂 Thanks for joining us at From The Archives Friday!